2022. 7. 25. 17:13ㆍAI/라이브러리
GPU, CPU 정보 확인

view() vs reshape()
torch.tensor.view()
torch.tensor.reshape() # 사용 권장
# 두 함수 모두 tensor의 shape을 변경해주지만 데이터가 contigous 하지 않을경우 view는 동작하지 않을수있음
nn.Module vs nn.Functional.function
class를 instance화 시킨후 사용하는 nn.Module 방식과
function을 바로사용하는 nn.Functional 방식으로, 코딩 스타일에 맞게 구현하면 된다
[개발팁] torch.nn 과 torch.nn.functional 어느 것을 써야 하나?
파이토치를 쓰다보니 같은 기능에 대해 두 방식(torch.nn, torch.nn.functional)으로 구현 된 것들이 있다. 관련된 글들을 찾아보니 결론은 두 방식 다 같은 결과를 제공해주며 편한 것으로 선택해서 개
cvml.tistory.com
nn.ReLU() vs nn.Functional.ReLU()
Class와 Function으로 사용방법의 차이
weight 가 필요한지에 따라 사용방법이 다르다
# weight 없음
x = nn.funtional.relu(x)	# function으로 instance 생성 없이 사용가능

relu = nn.ReLU()			# class로 instance 생성후 사용 가능
x = relu(x)

class Net():
	def __init__(self):
    	self.linear = nn.Sequential(
        	nn.ReLU()	# class 생성시 사용가능
                                    )
	def forward(self, x):
...[개발팁] torch.nn 과 torch.nn.functional 어느 것을 써야 하나?
파이토치를 쓰다보니 같은 기능에 대해 두 방식(torch.nn, torch.nn.functional)으로 구현 된 것들이 있다. 관련된 글들을 찾아보니 결론은 두 방식 다 같은 결과를 제공해주며 편한 것으로 선택해서 개
cvml.tistory.com
weight가 필요한 layer는 사용방법이 다르다
# weight pass
output = F.conv2d(input, filter)

# weight 자동 initialize
func = nn.Conv2d(input_channel, out_channel, kernel)
output = func(input)
https://dororongju.tistory.com/143
3. Pytorch nn과 nn.functional
필요 패키지 import torch.nn as nn import torch.nn.functional as F 문서 nn https://pytorch.org/docs/1.0.1/nn.html nn.functional https://pytorch.org/docs/1.0.1/nn.html#torch-nn-functional nn 과 nn.fu..
dororongju.tistory.com
nn.Module vs nn.Sequential vs torch.autograd.Function 상속 차이
class SSD(nn.Module): 			# layer 구현시 nn.Module 상속하는 방법
    def __init__(self, phase, cfg):
        super(SSD, self).__init__()
        self.relu_1 = nn.functional.ReLU()
        self.relu_2 = nn.ReLU()

    def forward(self, x):
    	x = self.relu_1(x)		# in-place = False 형식으로 사용하는 function
        x = nn.Sequential(self.relu_2)		# nn.Sequential 사용시 in-place = True로 동작
		return x

class SSD(nn.Sequential): 			# layer 구현시 nn.Sequential 상속하는 방법
    def __init__(self, phase, cfg):
        super(SSD, self).__init__()
        self.relu_1 = nn.functional.ReLU()
        self.relu_2 = nn.ReLU()

    #def forward(self, x): ... # nn.Sequential 상속으로 forward 구현 생략가능

class Detect(Function):			# forward 구현시 torch.autograd.Funtion 상속해야함
    def __init__(self):
        self.softmax = nn.Softmax(dim = -1)

    def forward(self, output):
        return output
train(), eval()
# Dropout(), BatchNormalize() 의 training 속성값을 True, False로 변경하여
# train과 inference때 layer 동작을 설정함
model.train()
model.eval()
torch.nn.functional.interpolate() vs torch.nn.Upsample()
두 함수 차이 없으며, 이미지를 확대, 축소하는 기능이다. 다만 upsample()은 deprecated warning을 띄운다
size(height, width) 또는 scale_factor(float) 중 하나를 사용하고, tensor와 mode를 인자로 넘겨준다. ailgn_corner는 변경전후의 픽셀의 위치를 일치 시킬지를 정하는 것으로 아래 사이트 참고..
interpolate(tensor, size(h,w), mode('bilinear'), align_coner=True)
torch.nn.functional.interpolate(
    input, # input tensor
    size=None, # output spatial size로 int나 int 형 tuple이 입력으로 들어옵니다. (height, width)
    scale_factor=None, # spatial size에 곱해지는 scale 값
    mode='nearest', # 어떤 방법으로 upsampling할 것인지 정하게 됩니다. 'nearest', 'linear', 'bilinear', 'bicubic', 'trilinear', 'area'
    align_corners=False, # interpolate 할 때, 가장자리를 어떻게 처리할 지 방법으로 아래 그림 참조.
)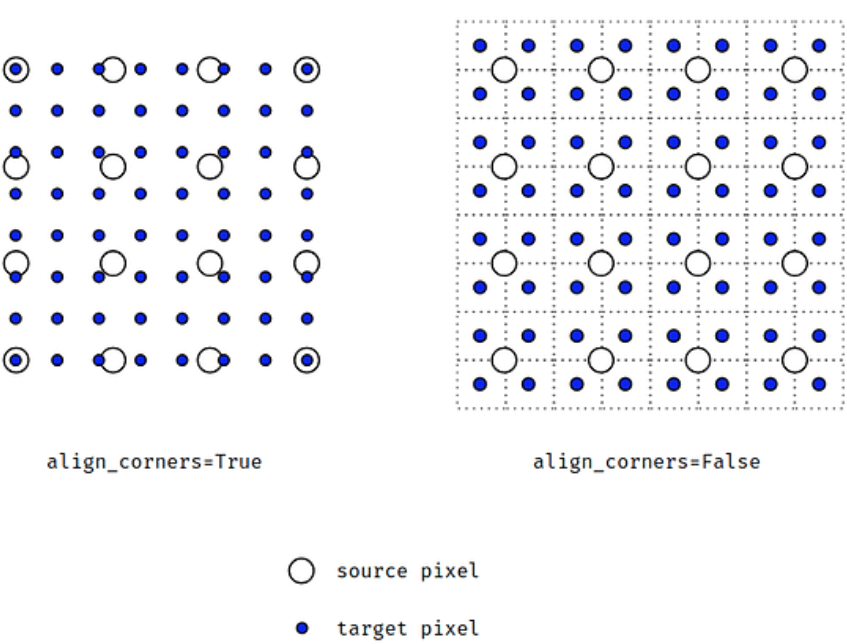
https://gaussian37.github.io/dl-pytorch-snippets/#finterpolate%EC%99%80-nnupsample-1
Model summary - import pytorch_model_summary
!pip install pytorch_model_summary
import pytorch_model_summary
print(pytorch_model_summary.summary(net,
				torch.zeros(1,3,475,475),
                                    show_input=True,
                                    max_depth=None,
                                    show_parent_layers=True))
Multiple mini batch - 고정된 RAM 크기에서 bacth size 늘리기
RAM 크기가 부족한 경우 batch size를 늘리는 방법으로,
loss는 batch_multiplier로 나누고 loss.backward()는 매번 실행한다. 그리고 opimizer.step()는 일정 step마다 으로 실행한다
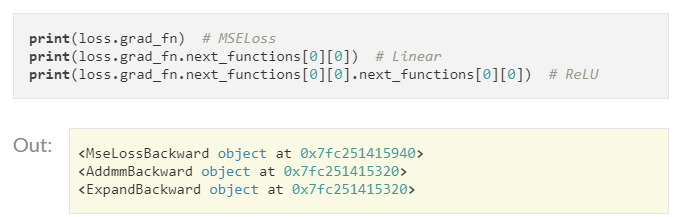
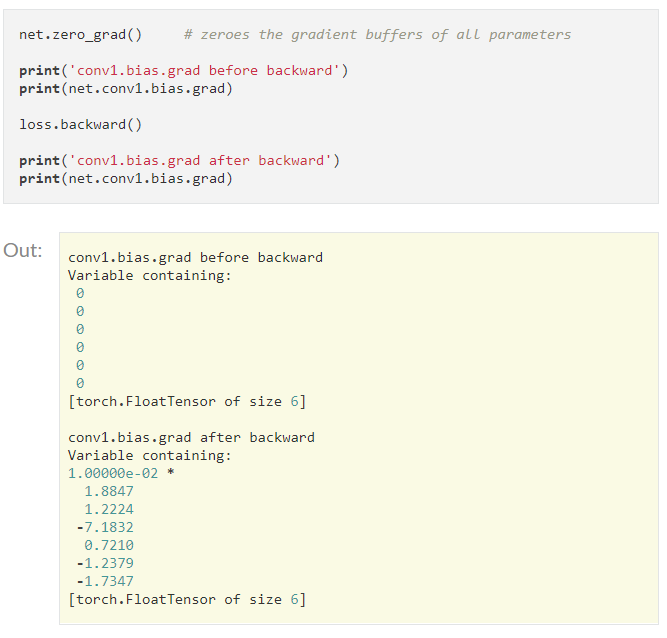
backward() : loss 값으로 graph의 내의 변수들의 grad 를 매번 누적하여 계산한다
 |
 |
count = 0
for inputs, targets in training_data_loader:
    if count == 0:
        optimizer.step()
        optimizer.zero_grad()
        count = batch_multiplier

    outputs = model(inputs)
    loss = loss_function(outputs, targets) / batch_multiplier # batch_multiplier 적정값 선택
    loss.backward()

    count -= 1
https://medium.com/@davidlmorton/increasing-mini-batch-size-without-increasing-memory-6794e10db672
Increasing Mini-batch Size without Increasing Memory
The most popular technique used to train neural networks today is gradient descent, where the error of the network is minimized by…
medium.com
detach().cpu().numpy()
위 동작을 할때 순서가 헷갈리기에 정리함
detach() : Tensor의 graph에서 분리하여 새로운 tensor를 만든다
cpu() : GPU에서 CPU로 이동 (numpy() 작업은 cpu에서 가능), cpu().detach()의 순서일경우, graph를 cpu로 옮긴후 분리하므로 비효율적이다. 물론 큰차이는 없는듯하다
numpy() : tensor를 numpy로 변환하며 메모리를 공유한다
Tensor 변환 < -- > numpy, PILImage
numpy -> tensor
new = torch.Tensor(numpy) # memory 할당
new = torch.from_numpy(numpy) # memory 공유

PIL.Image -> tensor
new = torchvision.transforms.ToTensor(PILImage)

tensor -> numpy
new = tensor.numpy() # numpy로 변환

tensor -> PILImage
new = torchvision.transforms.ToPILIMage(PILImage)
Image 보기
PIL.Image, numpy, Tensor 인 경우 이미지를 보는 방법이 모두 다르다
img = PIL.Image.open(img_path) # image_path로 img 열기
img : PIL Image object	# H,W,C 구조, [0 ~ 255]
img.show() # colab, unix, linux에서는 실행 안됨
plt.imshow(img)

img_np = np.array(img)	# numpy object를 matplotlib으로 열기
plt.imshow(img)
plt.show()

img_cv2 = cv2.imread(img_path) # numpy array로 열기
img_cv2 = cv2.cvtColor(img, cv2.COLOR_BGR2RGB) # BGR 채널 순서를 RGB로 변경 - 파랗게 보임
plt.imshow(img_cv2)
plt.show()


img_tensor_1 = torch.Tensor(img_np) # tensor는 (C,H,W) 구조, [0 ~ 1)
img_tnesor_2 = torchvision.transforms.ToTensor(img_np) #numpy나 PIL.Image 객체 모드 변환 가능
img_tensor = img_tensor.permute(1,2,0) # 채널순서를 (H,W,C)로 변경
plt.imshow(img)
plt.show()

torchvision.utils.make_grid([tensor1,tensor2...], nrow=3) # row당 3개씩 image 출력
plt.imshow(grid.permute(1,2,0)) # tensor의 C,H,W 순서 변경 -> H,W,C
plt.show()
image augmentation은 Albumentations 라이브러리 사용
torchvision.transfomrs 보다 속도 빠름
간단 사용
https://albumentations.ai/docs/getting_started/mask_augmentation/
document
colab example
albumentations examples
Colaboratory notebook
colab.research.google.com

Resnet50 분석
torch.models.Resnet50(weights = True) #transfer learning을 위해서 weights를 가져온다
resnet.children() # 전체 layer를 하나씩 return 하는 generator 생성
resnet.layer_name # 각 layer에 접근
ct = 0
for child in resnet.children():
    ct +=1
    if ct<6:
        for param in child.parameters():
            param.requires_grad = False
child.parameters() # weight와 requires_grad 를 list로 return
param.requires_grad # False로 만들어 grad_step() 실행시 weight update 제외
'AI > 라이브러리' 카테고리의 다른 글
| fastai & pytorch 정리글 (0) | 2022.08.30 |
|---|---|
| Numba (0) | 2022.08.11 |
| Moviepy (0) | 2022.08.01 |
| Git 정리 (0) | 2022.07.29 |
| Torch 튜토리얼 (0) | 2022.07.24 |